|
ThinkingApplied.com
|
|
Mind Tools: Applications and Solutions |
Piano
Technique and Kinesthetic Imagery
Download
as PDF file
Introduction
If you imagine yourself sucking the juice from a lemon, your mouth may water in response—a simple demonstration of mental imagery's physiological consequences. Your watering mouth is a somatic replica of your image of tasting a lemon. In creating the image, you drew on your sensory experience with lemons.
If you have never tasted a lemon, your body won't make this response. You lack the experience needed to create the evoking image.
Although I cannot directly communicate to you a lemon's taste, I can give you a set of instructions that will let you experience the sensation for yourself and, later, recall its image in your imagination. The instructions are simple: Buy a lemon. Wash it. Slice it. Suck it.
This article is a set of instructions for developing kinesthetic imagery at the piano. Kinesthesia is the sensory effect of the muscular contractions used to maintain or change the spatial relationship of body parts.
Kinesthetic imagery is a fundamental component of technical competence at the piano (or any musical instrument). The instructions for developing it are more involved than those for the lemon response. But if you work through them, you will discover a powerful tool to enhance your learning.
Demonstrations
To prepare you for the instructions (which appear in a later section), we first demonstrate some physical and cognitive principles related to kinesthetic imagery. There are two sets of demonstrations, easily performed using common objects: a table, a pencil, a thumbtack, a coin, a newspaper, and a glass.
Set 1. The virtue of uprightness: Simple demonstrations of angle and forceThe first set of demonstrations shows what happens when your fingers contact the piano keys in various ways. Remember the demonstrations later when you are asked to place your hands on the keyboard and shape them to a given chord.
Demonstration 1: The pencilAt the piano, an inclined finger is most stable when its supporting fingertip is perpendicular to the key surface.
Demonstration 2: The thumbtackWhen a force is concentrated into a small area, its effect is intensified. When the same force is spread over a larger area, its effect is dissipated. (It's easier to crack a block of ice with the point of an ice pick than with the handle.) At the piano, you maximize the effect of applied force when you minimize the area of the fingertip that contacts the key.
Demonstration 3: The handConclusions from Demonstration 1, 2, and 3. Demonstration 1 shows that an inclined finger is most stable when its tip is perpendicular to the key surface. Demonstration 2 shows that the effect of a force on a piano key is greatest when applied through the least possible surface area of a finger. Demonstration 3 shows that the contact area between a finger and a key grows smaller as the finger tip approaches the perpendicular. Thus, perpendicular fingertips promote both hand stability and the efficient application of force.
Set 2. Preliminary demonstrations of kinesthetic imagery
The second set of demonstrations reveals your (normally unconscious) use of kinesthetic imagery in routine daily tasks.
Demonstration 4: The water glassNotice that your hand has assumed the contour of the glass without touching it. Your hand's shape was generated mentally from an internal kinesthetic image—not molded physically around an external object.
Demonstration 5: The pencil againNotice that your hand has assumed the shape needed to lift the pencil—and that the shape was generated from within. You did not touch the pencil.
Demonstration 6: The glass and the pencilNotice that the two hand shapes feel different. Each shape has its unique sensations, distinct from those of the other shape.
Demonstration 7: The kinesthetic image of the glass
Your set of sensations at the point of imagined freezing is your kinesthetic image of the hand shape needed to pick up the glass. With proper practice, you can learn to intensify such images, to differentiate one from another, and to physically replicate them in your body at will. Piano technique is rooted in similar images, although for most people the images are so indistinct that they remain below the threshold of awareness.
We approach kinesthetic imagery from the perspective of note blocks. (A note block is any set of notes that could be played simultaneously with a single hand shape—even if those notes occur successively in the music itself. By this definition, a four-octave major scale is basically a pattern of alternating three-key and four-key note blocks.
The kinesthetic image of any passage is the imagined sensations of the hand shapes that correspond to its note blocks. So, the kinesthetic image of a four-octave major scale is the imagined sensations of the hand shapes that correspond to its alternating three-key and four-key note blocks.
There are important reasons for our note-block approach.
First, the muscular set of a note block is the fundamental kinesthetic unit. Virtually all pianistic textures are reducible to note blocks. Any texture—whatever it might be—is ultimately a rhythmic ordering of the tones of note-block hand shapes.
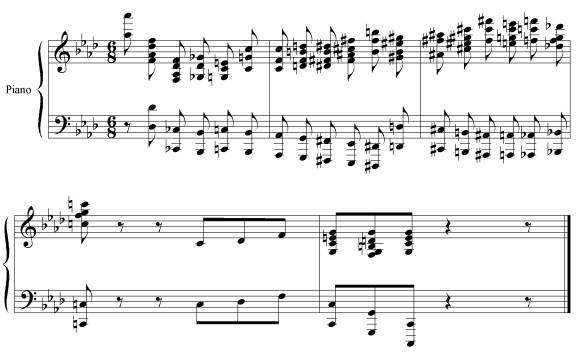
Second, the textures most taxing to kinesthetic imagery are those in which the note blocks (and their corresponding hand shapes) change frequently. The highest rate of change occurs in rapid chordal passages (and, paradoxically, in certain contrapuntal passages where the hand must be reconfigured for each new note). An example of the former is this passage from Chopin's Ballade in f minor, Op. 52, surely one of the most technically challenging chord progressions in the standard repertory.
Chopin, Ballade in f Minor, Op. 52, measures 198-202
To develop kinesthetic imagery, begin with a chordal texture—the note blocks will be clearly delineated from one another, as the above example shows. Other textures lack this visual clarity, requiring you to figure out the note blocks before addressing the kinesthetic imagery.
Don't be intimidated by the difficulty of the Chopin excerpt. Our approach applies equally well to the simplest pieces. To familiarize yourself with it, apply it to any short chordal passage that you know, but find problematic. Choose your passage, and we'll begin.
Building the kinesthetic image of a single chord (note block)
Eliminating frictionStep 1. Guided by the perpendicular-fingertip principle demonstrated earlier, touch a chord's (note block's) keys with the appropriate fingers, letting the keys' topography shape your hand(s). Although you may be unaware of it, the shape is maintained by more than your muscles. There is friction between your fingertips and the key surface. The friction helps your hand retain the chord's shape—especially when the chord's notes are widely spread.
Step 2. With your hand shaped to the chord and your fingers motionless, lift your forearm very slightly so that your fingertips are poised a quarter-inch directly above their corresponding key surfaces. In this position, surface friction is eliminated; your arm and hand muscles are compelled to maintain the chord shape on their own. Control of the shape is no longer delegated to keyboard friction; it now resides exclusively within your body—as it should.
Hold this poised position for several seconds, paying attention to the sensation of its frictionless muscular set. (The narrow quarter-inch gap between fingertip and key surface is critical: It intensifies the sensation.)
Solidifying the shape
Step 3. Sustain the hand shape with your muscles, keeping your fingertips poised a quarter-inch above the chord keys. With your forearm and hand moving as a single fixed unit, lightly bounce your forearm up and down a half-inch—hammer-like, wrist immobile—so that your fingertips solidly tap the keys four or five times without depressing them.
Tapping with the forearm solidifies the hand shape, which takes on some rigidity. (Generally, the shaped hand must be rigid at the instant of impact to efficiently transfer the force of the falling arm to the keys—you can't hammer a nail with Jello.)
Step 4. Compare the "on-the-key" muscular sensation of Step 1 (where your hand needs less rigidity because its shape is partially maintained by surface friction) with the "above-the-key" muscular sensation of Step 2 (where your hand needs more rigidity because its shape is solely maintained by muscular contraction). Alternate between the two elevations and muscular states: "on-the-key" and less rigid, "above-the-key" and more rigid. Contrast their sensations, spending five to ten seconds in each state.
The sensation of the "above-the-key" frictionless hand shape is the better kinesthetic image of the chord. That's because the frictionless sensation can be replicated as a muscular set in the hand before it lands on the keys. The sensation of a friction-assisted shape can't be replicated in the hand until afterward, when it actually touches the keys. Advance replication of the kinesthetic image in the hand is critical in fast passages.
Rebuilding the shape
Step 5. Let your forearms and hands drop heavily into your lap. Relax them completely, erasing any physical trace of the chord's muscular set. Wait for your body to become completely still.
Rebuild the chord's hand shape a quarter-inch above its keys, but do not touch them. The kinesthetic sensation of the shape is reinforced when you configure the hand without the tactile aid of surface friction and keyboard topography.
As before, lightly bounce your forearm, tapping the key surface to solidify the hand shape. The resulting muscular set contains all the kinesthetic information you need to play the chord. Rebuild this muscular set several times a quarter-inch above its keys. Always start from scratch, your hands resting comfortably in your lap. The reason will soon become clear.
Evaluating the kinesthetic image
Step 6. Sit quietly with your hands and arms resting in your lap—let them become still, heavy, completely relaxed. Let your body become quiet, motionless.
Look at the keyboard, focusing on the exact keys where your fingers must land. Close your eyes. In your imagination, try to "see" the chord's keyboard location. If this proves difficult—as well it might at first—repeat the process a few times to strengthen the visual image.
Open your eyes, but remain absolutely still. Try to "feel" in your hands and arms the chord's shape at its location on the keyboard.
When you register the feel, sustain it a moment. Then, with a single quick uninhibited impulse, pounce on the keys. It is far better to spring fearlessly and land on the wrong notes than to reach cautiously and grope your way to the right ones.
At first, you'll have your share of clunkers. Make your mistakes loudly, without restraint and regret. Give them your full attention. After you pounce, leave your hands exactly where they landed. Why did you hit those wrong notes instead of the many others available to you? Your meticulous observation of your errors will refine your kinesthetic image of the chord.
The fear of hitting a wrong note causes many players to unconsciously brake their freefall a microsecond before impact and tactilely search for the correct finger placement. Become aware of this counterproductive behavior. Process the chord's feel before you arrive at the keys, not after. In fast passages, there is no time to search.
Repeat Step 6 several times. As you do, take the following into account. After a chord is played, a trace of its muscular set often remains stored in the hands and arms. If you retain the muscular set between repetitions, you defeat the objective of your practice. The objective is to learn to build the chord shape instantaneously from nothing but its kinesthetic image. In performance, no residual muscular information will be there to assist you; so, you must not rely on it when you practice. Completely erase the muscular set of the shape before each repetition.
Gauge your progress in terms of your previous errors. In a series of trials, look for a trend of subtly increasing accuracy. If the distance by which you miss a note narrows over time—say, from a half-inch to an eighth-inch—your accuracy is improving. But to recognize that, you must be observant. Ignore the cacophony; watch the trend.
Learning a chord (note block) series
Step 7. Once you have internalized the kinesthetic image of each individual chord (note block), you are equipped to deal with the chord series as a whole. Pounce on each chord in succession. After landing on a chord, return your hands and arms to your lap, and relax.
Before internally feeling the next chord, eliminate from your body all traces of the played chord's muscular set. If you don't, its residual sensations will compete with your kinesthetic image of its successor. (It's harder to imagine the feel of one hand shape when your muscles retain the set of another.)
Practicing a series in this way, you will come to perceive each chord as an associate of the two chords that neighbor it—a link in a harmonic chain. With repetition, the harmonic chain spontaneously turns into a stimulus-response chain. The feel of each chord becomes a stimulus that triggers the feel of its successor.
But your earlier work will have given you a perceptual advantage. You won't be dependent on the stimulus-response chain to navigate the passage. For you will also perceive each chord as a self-contained cognitive unit, an independent hand shape, reproducible without the stimulus of its preceding neighbor.
This multi-leveled perception is a safety net. Players who know the chords as independent kinesthetic events have added capacity to recover from a slip, whereas players who depend solely on the stimulus-response chain can lose their way if a single chord goes awry—just as a "wired-in-series" light string goes out if any bulb malfunctions.
In complicated passages, it is wise to heighten each chord's cognitive independence. Practice the chord series in ways that disrupt the stimulus-response chain: Play only the odd (or even) numbered chords; play the series backward; play the chords in random order.
Building kinesthetic images in other textures
When a note block's keys are to be played successively—not simultaneously, as above—its kinesthetic image is more sophisticated. Added to the feel of the note block is: (1) the feel of the order in which the fingers depress the keys and (2) the feel of the mechanical action by which they depress them.
Mechanical action. A finger can strike a key in various ways. Learn to distinguish the feel of two classes of mechanical action:
Many technical problems disappear when you replace the former action with the latter.
Additional steps. To develop kinesthetic imagery in non-chordal textures, first treat the note blocks as "chords" of simultaneously struck keys, following the previous Steps 1 through 7. Then proceed with Steps 8 and 9.Step 8. Look again at the keyboard, focusing on the exact keys where your fingers must land. Close your eyes, and in your imagination try to "see" the note block's keyboard location.
Visualize the order in which the keys are to be played, ignoring their rhythm for now. (You can't play notes "in rhythm" until you can play them "in order.")
Once you "see" the keys' order, then—at a comfortable tempo—visualize that sequence in rhythm.
Step 9. Open your eyes, but remain absolutely still. In your motionless hands and arms, "feel" the note block's shape at its location on the keyboard. Then "feel" in rhythm the key sequence and the mechanical action with which you will play it.
When you register the feel, wait a moment. Then, with a single quick uninhibited impulse, pounce—playing the sequence in one continuous rhythmic gesture as the hands fall on the keys. Repeat this step several times. Completely erase the muscular set of the shape before each repetition.
Reducing Cognitive Complexity
When you are first learning a passage, the creation of each hand shape is a mental task that demands your attention. For you to move from one shape to the next, your attention must shift. Each shift is a cognitive event.
A passage's cognitive complexity is measured in attention shifts per unit of time. The higher this rate, the harder the passage is to process and assimilate. Any strategy that reduces the number of attention shifts will speed your learning.
In a chordal texture, there is typically but one option for grouping notes into hand shapes. But in other textures, choices abound. Having options, you should group as many notes as feasible into one hand shape, and—if practical—repeat a hand shape (and its fingering) in successive note groups.
Efficient grouping minimizes attention shifts. Complexity is reduced; imagery is simplified. In the final analysis, technique is not rooted in physical gymnastics, but in mental process.
©2005 ThinkingApplied.com
![]()